Orchid Yellow Leaves: What Each Pattern Means & How to Fix It
Why orchid leaves turn yellow — normal aging vs. overwatering, sunburn, temperature stress, and disease — and how to tell which one you have from the pattern.
10 min read · Updated 2026-08-01
By PlantFix Editorial Team · Sources: University Extension Programs, USDA, EPA
Why Are Your Orchid's Leaves Turning Yellow? (Quick Answer)
One yellow leaf at the very bottom of the plant is usually nothing: moth orchids (Phalaenopsis, the type sold in nearly every grocery store) naturally shed their oldest one or two leaves each year, and those leaves turn evenly yellow before dropping. You don't need to do anything.
Multiple yellowing leaves, or yellowing that starts at the top of the plant, is a problem. The most common serious cause is overwatering leading to root rot — check the roots through the pot before anything else. Healthy orchid roots are firm and silvery-white when dry, bright green when wet. Brown, mushy, or hollow roots mean rot, and the yellow leaves are the symptom, not the disease.
Other causes have distinct patterns: bleached-yellow patches that turn brown mean sunburn; yellow limp leaves after a cold night near a window mean chill injury; a uniform pale yellow-green across the whole plant usually means hunger or natural light starvation. The decision guide below matches each pattern to its fix.
Normal Leaf Aging: When Yellow Is Fine
A healthy adult moth orchid carries roughly three to six thick, leathery leaves and replaces them slowly — as a new leaf grows from the top of the plant, the oldest leaf at the bottom is retired. That retiring leaf turns evenly yellow over a few weeks, then papery and brown, and eventually detaches on its own.
You can recognize normal aging by three things. It affects only the lowest leaf (occasionally the lowest two). The yellowing is even across the whole leaf rather than blotchy or patchy. And the rest of the plant looks normal: firm green upper leaves, plump roots, no wrinkling.
Resist the urge to pull a yellowing leaf off early. Tearing it can wound the stem and open an entry point for bacteria and fungi. Let it come away on its own, or wait until it is fully yellow-brown and loose, then remove it with a gentle sideways tug. If you prefer to cut, use a razor blade or snips sterilized with rubbing alcohol — orchid viruses spread readily on unsterilized cutting tools, which is why the American Orchid Society recommends sterilizing between every cut and every plant.
Overwatering and Root Rot: The Most Common Real Cause
When several leaves yellow at once — especially if they also go limp and leathery — the problem is almost always underground. Orchids are epiphytes: in nature they grow attached to trees, with their roots exposed to air and drenched only intermittently by rain. Those roots are wrapped in a spongy silver coating called velamen that absorbs water fast but must dry out between drinks. Kept constantly wet in a pot, velamen suffocates and rots.
The frustrating part is that a rotting orchid shows the same above-ground symptoms as a thirsty one: limp, wrinkled, yellowing leaves. That's because either way the plant can't move water — dead roots absorb nothing. Watering harder because the leaves look thirsty is how most orchids die.
So diagnose at the roots, not the leaves. Most moth orchids are sold in clear inner pots precisely so you can look. Firm roots that are green when wet and silver when dry are healthy. Brown, black, mushy, flattened, or hollow roots — or a sour smell from the pot — mean rot. If that's what you see, go directly to our orchid root rot guide for the full rescue procedure: trimming dead roots, repotting in fresh bark, and adjusting watering so it doesn't recur.
If the roots look healthy and plump, rule out the remaining causes below before changing anything about your watering.
Too Much Light: Sunburn and Bleaching
Moth orchids evolved under a forest canopy and want bright, indirect light — an east-facing windowsill is close to ideal. Direct midday sun through glass can push leaf temperature high enough to cook tissue in a single afternoon.
Sunburn has a distinctive look: the yellowing appears as a bleached, washed-out patch on the part of the leaf facing the window, often developing a brown, black, or white papery center where tissue died outright, sometimes with a yellow halo around it. It affects the most light-exposed leaves — usually the upper ones — while shaded leaves stay green. Burned patches never recover, but they also don't spread; the leaf keeps working around the scar.
The opposite problem also shows up as yellow, more gradually: a plant kept in a dim corner slowly pales from deep green toward yellow-green across all its leaves as it runs short on the energy to maintain them. As a rule of thumb, a well-lit moth orchid has bright grass-green leaves; very dark green leaves mean not quite enough light, and yellow-green means either too much light or too little food.
The fix is placement: bright indirect light, with any direct sun limited to gentle morning hours. If your only option is a south or west window, pull the plant a few feet back or filter the light through a sheer curtain.
Temperature Stress: Cold Drafts and Chill Injury
Moth orchids are comfortable in the same range people are — roughly 65–80°F during the day, not below about 60°F at night. Sustained cold, or even a few hours below roughly 50°F, causes chill injury: leaves develop irregular yellow patches that later turn brown or sunken, sometimes days after the cold event itself.
The classic scenario is a windowsill orchid in winter. Glass radiates cold overnight, and leaves touching the pane can be 10–15 degrees colder than the room. Cold drafts from doors, single-pane windows, or air-conditioning vents produce the same patchy yellowing on whichever side faces the draft.
Heat stress is less common indoors but real: temperatures above about 90°F, or a spot above a radiator or heat vent, will yellow leaves while also rapidly drying the plant.
The fix is simply relocation — off the cold sill in winter, away from vents year-round. Damaged patches won't re-green, but new growth will come in normal. One related note: a modest nighttime temperature drop of about 10 degrees in autumn is actually what triggers moth orchids to produce a new flower spike, so cooler nights aren't the enemy — freezing sills and direct drafts are.
Nutrient Problems: Hunger and Fertilizer Burn
Orchids are light feeders, but they do feed. A plant that has lived in the same decomposing bark for years with little or no fertilizer will slowly fade to a uniform pale yellow-green, oldest leaves first — classic nitrogen hunger. The remedy is gentle: a balanced, urea-free orchid fertilizer at quarter to half the label strength, applied "weakly, weekly" during active growth, as both the American Orchid Society and Clemson Cooperative Extension recommend.
The opposite error — heavy feeding — yellows leaves too, through fertilizer salt buildup. Salts accumulate in the bark and on root surfaces, scorching root tips and showing up above as yellowed leaf tips and edges that turn brown and crispy. You may also see white crust on the bark or the pot rim.
Prevent both problems with the same routine: feed weakly during growth, skip feeding when the plant is resting, and flush the pot with plain water once a month, letting water run freely through the bark for a minute to carry accumulated salts out the drainage holes.
Pests and Diseases That Yellow Orchid Leaves
If watering, light, and temperature all check out, inspect closely for freeloaders.
- Scale and mealybugs are the most common orchid pests. Boisduval scale looks like tiny flat white-to-tan discs along leaf undersides and the leaf bases; mealybugs look like specks of cotton fluff in crevices. Both suck sap, yellowing leaves in blotches around feeding sites, and both leave sticky honeydew. Treat by dabbing each insect with rubbing alcohol and following up with insecticidal soap.
- Spider mites cause a fine yellow stippling — thousands of pinprick dots — often with faint webbing underneath leaves. They thrive in dry indoor air.
- Crown rot is a disease emergency rather than a pest: water left sitting in the growing point at the top of the plant lets bacteria and fungi destroy it. The newest central leaves yellow first, then turn brown-black and mushy, and the whole crown may pull away with a gentle tug. Blot the crown dry immediately, stop overhead watering, and treat the crown with 3% hydrogen peroxide; even so, advanced crown rot is often fatal to the central growing point.
- Viral infection shows as irregular yellow streaks, rings, or mosaic patterns that no care change fixes. There is no cure; confirmed virused plants should be isolated or discarded, and cutting tools always sterilized between plants.
Match the Pattern: Diagnosis by Where and How Leaves Yellow
Work through these patterns from the top and stop at the first match:
- Only the bottom leaf, yellowing evenly, plant otherwise normal → natural aging. Do nothing.
- Several leaves yellow and limp; roots brown or mushy in the pot → overwatering and root rot. Repot and trim immediately.
- Leaves yellow, limp, and wrinkled; roots silvery, shriveled, and dry; bark bone-dry → severe underwatering. Soak the pot for 15 minutes, then resume proper weekly watering.
- Bleached patch with brown or papery center on the window-facing side → sunburn. Move out of direct sun.
- Irregular yellow patches after a cold night or on the window side in winter → chill injury. Move away from the glass.
- Uniform pale yellow-green across the plant, no other symptoms → hunger or too much light. Feed weakly weekly and reassess placement.
- Yellow tips and edges with white crust on bark → fertilizer salt buildup. Flush monthly, halve feeding.
- Blotchy yellowing with sticky residue, cottony specks, or stippling → pests. See the pest section above.
- Newest central leaves yellowing and turning mushy → crown rot. Act the same day.
If the leaves are also curling, wrinkling, or dropping rather than only yellowing, see our companion guides on orchid leaves curling and orchid leaves falling off — and if the whole plant is crashing, the dying orchid rescue triage sorts it in 60 seconds.
Still stuck, or seeing symptoms on other houseplants too? Our general yellow leaves guide covers every cause across all plant types, and the diagnosis tool walks you through it question by question.
Recommended Products
We earn a commission if you buy through these links, at no extra cost to you. We recommend based on what works, not what pays. How this works.
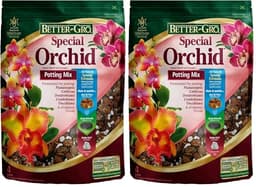
Chunky fir-bark medium that gives orchid roots the air they need — the fix for most yellowing tied to soggy, broken-down media. Repot into fresh bark every one to two years, or immediately when treating root rot. Medium grade suits most moth orchids; never use regular potting soil.
$8-$15 · Best for Repotting orchids out of soggy or decomposed media
Check price on Amazon →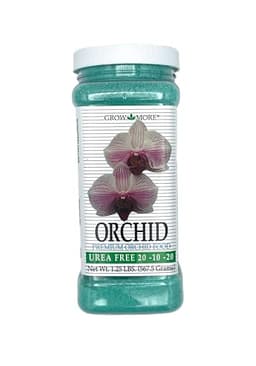
Balanced feed for the "weakly, weekly" routine: quarter to half strength during active growth. Urea-free formulas provide nitrogen in forms orchids can use in bark culture. Fixes the slow all-over pale-yellow fade of an unfed orchid without the salt burn that heavy feeding causes.
$8-$15 · Best for Correcting uniform pale yellow-green leaves from hunger
Check price on Amazon →
Clean removal of spent leaves and flower spikes without tearing stem tissue. Sterilize the blades with rubbing alcohol between every cut — orchid viruses travel on tools, and a two-second wipe is the cheapest disease prevention there is.
$8-$15 · Best for Removing dead leaves and spikes with sterile cuts
Check price on Amazon →Treatment information on PlantFix is educational. When using any pesticide — including organic options like neem oil or insecticidal soap — read and follow the entire product label; the label is the law. For persistent or high-stakes problems, your local university extension service offers free, region-specific advice. Read about how we source and verify treatment guidance in our Editorial Standards.
FAQ
Should I cut yellow leaves off my orchid?▼
Not while they're still partly green — the plant is reclaiming nutrients from the leaf, and tearing it early creates a wound. Let a naturally aging leaf drop on its own, or remove it once it's fully yellow-brown and loose. If you do cut, use a blade sterilized with rubbing alcohol, because orchid viruses spread easily on cutting tools. Leaves lost to rot or disease are the exception: remove clearly dead, mushy tissue promptly with sterile tools.
Can a yellow orchid leaf turn green again?▼
Almost never. Once a leaf has broken down its chlorophyll, that tissue doesn't re-green — sunburn scars, chill patches, and fully yellowed leaves are permanent. The realistic goal is to fix the underlying cause so the remaining leaves stay green and new growth comes in healthy. The one partial exception is early, mild paleness from hunger or low light, which can deepen in color again once feeding and placement improve.
Why are my orchid's leaves turning yellow after repotting?▼
Some sulking is normal. Repotting disturbs roots, and orchids often pause and shed an older leaf or two while they re-establish — especially if roots were trimmed. Keep the plant in bright indirect light, water sparingly for the first couple of weeks, and don't fertilize for a month. Worry only if yellowing accelerates or upper leaves go limp, which suggests the roots are failing rather than adjusting.
My orchid's leaves are yellow AND wrinkled. What does that mean?▼
Wrinkled, leathery leaves mean the plant isn't moving enough water — but that has two opposite causes: roots that died from overwatering, or roots that dried out from underwatering. You cannot tell from the leaves alone. Look at the roots through the pot: brown and mushy means rot (repot and trim), while silvery, shriveled, and papery with bone-dry bark means thirst (soak for 15 minutes and fix your schedule).
Is it normal for leaves to yellow while my orchid is blooming?▼
Blooming is expensive, and a moth orchid will sometimes retire its oldest bottom leaf during or just after a long flowering — that single, evenly yellowing lowest leaf is normal. Multiple yellowing leaves during bloom is not; it usually means root trouble, and the flowers are masking it. Check the roots, and if they're rotting, cut the flower spike so the plant puts its remaining energy into survival instead of blooms.
Related
- Insecticidal Soap: What It Actually Kills (Including Spider Mites), DIY Recipe & Why Dawn Is Wrong →
- Mealy Bugs on Plants: How to Identify & Kill Them Fast →
- How to Revive a Dying Orchid: The 60-Second Triage →
- Orchid Leaves Curling or Wrinkled: Causes & Fixes →
- Orchid Leaves Falling Off: When It's Normal & When to Act →
- Orchid Root Rot: How to Identify, Treat & Repot a Rotting Orchid →
- Kill Mealybugs With Rubbing Alcohol (on Contact, No Burn) →
- Spider Mites: Identification, Treatment & Prevention Guide →
- Yellow Leaves on Plants: Every Cause & How to Fix It →
Not sure what's wrong?
Use the diagnosis tool →Get seasonal plant care reminders and pest alerts.